
 Posts
Posts


I've mentioned before that I have a problem finishing projects that I start. I can't tell if it's getting worse or better since I started this blog. I spend more time working on crafts, but once the excitement of a new project wears off, I get bored with it and start a new one. Then, I don't want to post about something until it's finished, so I eventually finish it up and write about it several months later. In order to embrace this habit, I've added a "WIP" list over on the left. Right now, it doesn't look very bad - only 5 projects. However, I'm pretty sure I've forgotten several.
I recently thought that I had all of my sewing projects organized in the basement. I went upstairs to search the last place anything could be, and I found a backpack with two partially completed scarves from several years ago when I taught myself how to knit. I started out with one skein of yarn. When I got to the end of it, rather than learn how to join another piece of yarn or finish off the scarf (simple concepts, I've since learned), I apparently went out and bought a new skein and started completely over. I even bought a new pair of knitting needles. At least they were a different size. I unravelled both of these scarves because I don't like the colors anymore, so maybe I'll start something else with them.
So let's see what happens when I have a list displayed publicly to the Internet. My guess is it will get embarrassingly long and then I'll remove it.
23 October 2010


16 October 2010
Blast from the Past: Beaded Bracelet
My 5th grade teacher was Mr. Wendel. The thing I remember most about him is that he abhorred little scraps of paper. You would think that an elementary teacher would just learn to deal with little scraps of paper, but he made us cut out paper in way that only left one scrap. If we made a mistake and had two or more scraps at the end of a cutting activity, we had to stay in from recess. To this day I still plan out my cutting so that I only have one single piece of paper to throw away at the end.
Anyway, the purpose of this post was not to demonstrate how well I can cut paper. Mr. Wendel also taught us how to make beaded bracelets. We started by coloring our designs in on graph paper. Then he had enough looms that we could each work on our bracelets while he read to us after lunch. Here is the design that I made.
 I liked this activity so much that I convinced my grandpa to make a loom for me. He nailed three pieces of wood in a U shape, then made thin cuts in the two open ends to hold the string. I wound the string around the loom to create the base threads and then was able to weave in the beads. Here are some instructions to make your own loom that’s only slightly different than the one I had or you can also buy one on Amazon: Darice 1012-24 Bead Loom
Thinking back on this, it really seems like seed beads rolling all over the tile floor while Mr. Wendel was reading would have been at least as annoying as multiple scraps of paper created by 5th graders.
Supplies Needed:
- Graph Paper
- Markers or Crayons for Design
- Beading Thread
- Seed Beads (Several Colors)
- Needle with Small Eye
- Scissors
- Bead Loom
11 October 2010
Hot Shops
Last summer my husband and I visited Hot Shops, a local art center here in Omaha. The first area we went in was Loken Forge. They had an activity where you could choose up to seven pieces of metal and arrange them into a sculpture. I immediately got really excited and started picking out my pieces, and then looked up a few minutes later and wondered why my husband wasn’t picking out any for himself. I found six suitable pieces and designed this awesome structure.

Since this activity was actually planned for children (and I don’t know how to weld), the guys at the Forge actually welded it for me. I did get to look through welding goggles while they did it. We walked around the rest of the Hot Shops while it cooled and then went back to the Forge where they spray painted it for me.
The rest of the Hot Shops were also very interesting. They have just about every medium of arts and crafts there. The one area we didn’t spend a lot of time in the glass blowing area (it was August when we went). I see they have another open house planned for December 4th and 5th, though, so I’ll probably check it out then!
Supplies Needed:
- Steel or iron base piece
- 5-6 small steel or iron pieces
- Blow torch
- Safety goggles
- Spray paint
30 September 2010
Paint Yourself Silly
For the entire four years I was at UNL, I wanted to go to Paint Yourself Silly. I finally went on one of the last weekends before my younger sister graduated (five years after I did). She, my mom, and I spent an evening in Lincoln's Haymarket painting and chatting. It was as much fun as I had dreamed it would be. Mom picked a flower vase, my sister choose a mug, and the moment I saw this Sun & Moon candle holder, I knew it was meant to be.
What I learned is that I am an extremely slow painter. By the time they were both finished and the workers kicked us out of the store because it was closing time, I was about 40% done with the first coat. Luckily, my husband ran the Lincoln Marathon a couple weeks later so I was able to finish my project then. The shop then glazed and fired it for me, and my sister picked it up the day before she graduated.
It was a fun time and I'm happy with the way it came out, but I need to learn how to paint quicker. They recommend applying at least three coats of paint so that the colors stay bold after it is fired. I thought I applied three coats everywhere, but you can see that the paint is pretty thin in some areas. I think one more coat would have done the trick.

Supplies Needed:
What I learned is that I am an extremely slow painter. By the time they were both finished and the workers kicked us out of the store because it was closing time, I was about 40% done with the first coat. Luckily, my husband ran the Lincoln Marathon a couple weeks later so I was able to finish my project then. The shop then glazed and fired it for me, and my sister picked it up the day before she graduated.
It was a fun time and I'm happy with the way it came out, but I need to learn how to paint quicker. They recommend applying at least three coats of paint so that the colors stay bold after it is fired. I thought I applied three coats everywhere, but you can see that the paint is pretty thin in some areas. I think one more coat would have done the trick.

Supplies Needed:
- Money (They supply everything else at Paint Yourself Silly)
- Ceramic Pottery
- Up to 6 Colors of Paint
- Paint Tray
- Paintbrushes
- Water
- Clear Glaze
- Kiln Fire
06 September 2010
My First Quilt - Part 2 (Strip Piecing)
The pattern I chose for the quilt is quite possibly the simplest and most basic block pattern available. In the world of quilting, common block patterns have names, and this one is "Rail Fence". I also used the common technique called strip piecing. In strip piecing, you sew long strips of different colored material together, then cut the strips to the proper size, turn them, and then sew the small pieces back together into larger blocks. In this picture, you can see an example of the strip before it is cut.

Next, I cut the strip into 6.5" pieces. Here is the same strip, cut down to size.

Finally, I turned the pieces, then sewed them together into my first block.

When sewing the strips, you don't need to reinforce the ends so that the stitches don't come out. First of all, when you cut the strips, only the first and last piece would have that reinforcement. More importantly, though, once all of the pieces are sewn back together, the seams intersect enough that they reinforce themselves to the point there is no danger of them coming apart. Of course, if a lot of time passes between sewing the strips and putting the blocks together, or you handle them a lot, they may start to unravel a bit. Since I was in a hurry to get this done by the baby shower, I finished them quickly enough that I didn't have a problem.
Finally, I decided to be a model quilter and iron frequently. Once I had the long strips put together, I ironed them so that the seam allowances laid nice and flat. I also ironed them away from the lightest colored fabric, so the dark purple didn't show through the light yellow.
I'm not including a supplies needed on this post because my next post regarding the quilt will be dedicated to the supplies for the whole project.

Next, I cut the strip into 6.5" pieces. Here is the same strip, cut down to size.

Finally, I turned the pieces, then sewed them together into my first block.

When sewing the strips, you don't need to reinforce the ends so that the stitches don't come out. First of all, when you cut the strips, only the first and last piece would have that reinforcement. More importantly, though, once all of the pieces are sewn back together, the seams intersect enough that they reinforce themselves to the point there is no danger of them coming apart. Of course, if a lot of time passes between sewing the strips and putting the blocks together, or you handle them a lot, they may start to unravel a bit. Since I was in a hurry to get this done by the baby shower, I finished them quickly enough that I didn't have a problem.
Finally, I decided to be a model quilter and iron frequently. Once I had the long strips put together, I ironed them so that the seam allowances laid nice and flat. I also ironed them away from the lightest colored fabric, so the dark purple didn't show through the light yellow.
I'm not including a supplies needed on this post because my next post regarding the quilt will be dedicated to the supplies for the whole project.
05 September 2010
Way Back Machine: Bear Cross Stitch
When I was in grade school, I attended a program at my church called "Skylarks". It was essentially the exact same as Girl Scouts, in that we worked on projects and earned badges. My church was two blocks away from my elementary school, so once a week I would walk with two other little girls after school to our Skylarks meeting. Our big project for the year was a stamped cross stitch picture. When I finally finished it, my mom framed it and it hung in my room for the next 20 years. My parents recently made me take possession of everything I still had in their house after moving out three times, so the bear has claimed a new spot on the wall above my sewing machine.

Supplies Needed (I don't actually remember):

Supplies Needed (I don't actually remember):
- Cross Stitch Kit
- Open Frame
19 August 2010
Art as a Cover Up
Once upon a time, we had a plasma TV hanging on our living room wall. Then, we rearranged the room so the TV sits on an entertainment center on the other side of the room. The room "flows" a lot better, but it left the wall looking like this:
 Actually, it was worse than this because the hardware that held the TV up left big holes in the wall that I later spackled over. So, we had a rather large empty space with an electrical outlet floating in it. I looked around for a wall hanging to cover it up, but anything big enough was very expensive. So, the wall remained empty for about a year until I finally put the following display together.

To determine where they should be placed on the wall, I taped pieces of paper up that were the same size of the canvasses and my parents, husband, and I moved them around until it looked right.
It was actually easier than I thought it would be. I used masking tape on the canvasses to keep the lines straight. If I were to do this project over, I would pick out a set of 5-6 colors in advance rather than start without a firm color scheme. I would also use only muted colors. I think the two small canvasses are a little too bright for the room, especially the green and yellow one. Overall, though, I like how it turned out. It sure beats the crooked outlet in the middle of the wall!
Supplies Needed:
 Actually, it was worse than this because the hardware that held the TV up left big holes in the wall that I later spackled over. So, we had a rather large empty space with an electrical outlet floating in it. I looked around for a wall hanging to cover it up, but anything big enough was very expensive. So, the wall remained empty for about a year until I finally put the following display together.
To determine where they should be placed on the wall, I taped pieces of paper up that were the same size of the canvasses and my parents, husband, and I moved them around until it looked right.
It was actually easier than I thought it would be. I used masking tape on the canvasses to keep the lines straight. If I were to do this project over, I would pick out a set of 5-6 colors in advance rather than start without a firm color scheme. I would also use only muted colors. I think the two small canvasses are a little too bright for the room, especially the green and yellow one. Overall, though, I like how it turned out. It sure beats the crooked outlet in the middle of the wall!
Supplies Needed:
- Canvas
- Masking Tape
- Ruler
- Paintbrush
- Paint
- Picture Hook Kit
- Picture Nails
- Hammer
14 August 2010
My First Quilt - Part 1 (Selecting the Pattern and Fabric)
Last September, I somehow decided to try quilting. My plan was to start very slowly, following instructions in a book, and make a practice quilt. Then, I was going to make a baby quilt for my 1st niece before she was born. Well, the day after I bought the fabric for the "practice" quilt, we found out that Hailey was most likely going to be born early, so I needed to speed up the process. As a result, the practice quilt is still just fabric in my basement, and Hailey's quilt has a lot of beginner's errors associated with it.
Step 1: Choose a Pattern
I searched for "easy baby quilts" on google, and eventually settled on this pattern. A "baby quilt" is usually very small, and I wanted Hailey to be able to use the quilt when she got older, too, so I decided to convert the pattern to a larger quilt size myself. This was beginner's mistake number 1. I didn't quite do the math for the backing correctly and was a little short on fabric when I got to that point. Also, I just now found the full size version of the same pattern, which would have made it a lot easier for me.
The pattern itself isn't that difficult, but since I had absolutely no experience quilting, it was a little over my head. It basically just had the instructions for the top piece, and figured that I knew how to turn it into a quilt from there. So, beginner's mistake number 2 was to assume that instructions that fit on two sheets of paper (including diagrams) could teach me all that I needed to know about quilting. Luckily, I had the book I had purchased for the practice quilt as well as the Internet to fill in the holes of my pattern.
Step 2: Choose the Fabric
The pattern called for three different fabrics: a dark tone-on-tone, a medium tone-on-tone, and a light print. When I went to the fabric store, I was looking for pink and purple fabrics, but I ended up with contrasting purple and yellow.
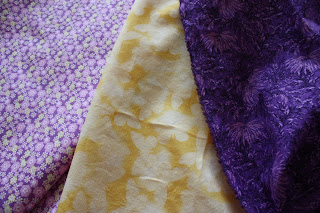 Stay tuned for the rest of the story!
Supplies Needed:
Step 1: Choose a Pattern
I searched for "easy baby quilts" on google, and eventually settled on this pattern. A "baby quilt" is usually very small, and I wanted Hailey to be able to use the quilt when she got older, too, so I decided to convert the pattern to a larger quilt size myself. This was beginner's mistake number 1. I didn't quite do the math for the backing correctly and was a little short on fabric when I got to that point. Also, I just now found the full size version of the same pattern, which would have made it a lot easier for me.
The pattern itself isn't that difficult, but since I had absolutely no experience quilting, it was a little over my head. It basically just had the instructions for the top piece, and figured that I knew how to turn it into a quilt from there. So, beginner's mistake number 2 was to assume that instructions that fit on two sheets of paper (including diagrams) could teach me all that I needed to know about quilting. Luckily, I had the book I had purchased for the practice quilt as well as the Internet to fill in the holes of my pattern.
Step 2: Choose the Fabric
The pattern called for three different fabrics: a dark tone-on-tone, a medium tone-on-tone, and a light print. When I went to the fabric store, I was looking for pink and purple fabrics, but I ended up with contrasting purple and yellow.
 Stay tuned for the rest of the story!
Supplies Needed:
- Pattern
- Three types of fabric
My Sewing Machine
I know, I know - three posts right away and then nothing for 10 months doesn't really mean that I have a blog. However, I did warn you that this might happen. Luckily, the lack of posting does not mean a lack of crafting! I kept myself busy over the winter (and spring and summer) with several projects.


I'm going to start off with a simple post about my sewing machine, which I bought last summer more or less on a whim. I purchased a Brother CS 6000i machine, shown here.
It had been about 10 years since I had even touched a sewing machine, and let me tell you - this is nothing like my mom's sewing machine of my childhood. It's so simple to use and make fancy stitches on. I'll showcase some of those later on, but here is a picture of the computer part where you select which stitch to use.
It also came with a ton of accessories which are conveniently stored in the free arm of the machine.
 Last, but not least, there is an accessory table to increase the sewing area or to use for quilting with a walking foot. I have not used this feature yet.
Last, but not least, there is an accessory table to increase the sewing area or to use for quilting with a walking foot. I have not used this feature yet.It does come with a cover, but it is just to keep dust off of the machine. It is not a carrying case.
Overall, I have been extremely happy with this machine. I have used it for one major project and it worked wonderfully.
01 October 2009
Wall Block Display

I hate throwing calendars away, so a few years ago, I got the idea to turn a couple of my favorite calendars into a display for the living room. This project took one evening to put together and only cost about $30!


Instead of finding a large picture or wall hanging for a big wall, you can create the illusion of a big display with several smaller pictures in a grid pattern. I used 20 blocks that were approximately 4" by 6" arranged into 5 columns and 4 rows. The columns are 18" apart at the centers and the rows are 12" apart. Since my blocks are different shapes, it was important to keep the centers aligned, rather than try to pick which point at the top should line up with adjacent blocks.

I was planning on painting the blocks, but I found stain pens that made this project even simpler. The pens come in a variety of colors and provide the image of stain but don't make any mess. The only negative aspect is that the stain fades periodically from the sunlight. I just restain them about once a year, but there is probably a paint sealer out there that would solve this problem.
The picture doesn't show the colors perfectly, but there is a pattern to the madness here. I used four different shapes of blocks (Rectangle, Oval, and Two Irregular Shapes) and four different colors (Green, Red, Brown, and Blue). Each shape was paired with each color, which created 16 unique blocks. I then duplicated an existing color/shape combination for the remaining 4 blocks. Every column has exactly one of each color and shape. Every row has each color and shape, but then one color and one shape was duplicated in the rows for the 5th block. The final result is that the pattern is not obvious, but it instead effectively randomizes the colors and shapes throughout the display. Certain members of my family have been known to switch the blocks around when they come to visit, but I've always caught them.
To make sure that they don't get messed up, though, I did write numbers on them when I moved from Kansas City to Nebraska. I also cut out the description of each picture from the calendar and pasted it on the back of the block.

The blocks are currently in our dining room. They add a lot of color to the white walls and tie in to the living room where I have posters from Spain framed and the remainder of the calendar pictures in simple frames over the stairs.

Supplies Needed:
- Wooden Blocks in a variety of shapes (Michael's or Hobby Lobby should have these)
- Wood Stain or Paint (Woodcrafter's Markers from Chartpak worked well)
- Mod Podge or other craft glue
- Old Calendars, Pictures, or Magazine Clippings
- Sponge for applying Mod Podge
- Exacto Knife for cutting the pictures to the same shape as the blocks
- Paintbrush (Unless you are using the stain pens)
- Brackets and Small Nails
- Hammer
- Frames (Optional)
Subscribe to:
Posts (Atom)